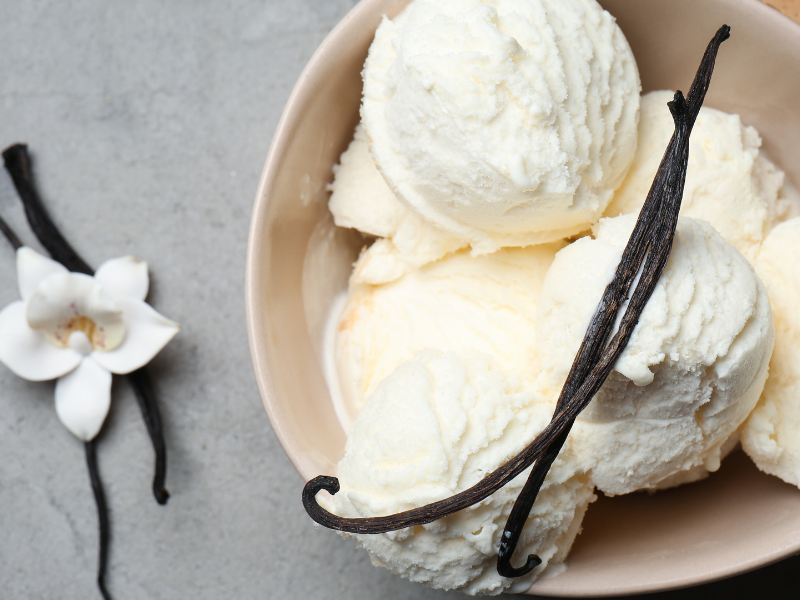
Introduction on Making Homemade Vanilla Bean Ice Cream
Vanilla bean ice cream is a classic treat, known for its rich flavor and creamy texture. With the aroma of vanilla beans and the perfect balance of sweetness, this ice cream is ideal for hot summer days, family gatherings, or as a base for a variety of dessert concoctions, including warm apple pies, chocolate brownies, and fresh oven-baked cookies.

Ingredients
- 1 cup whole Milk (chilled)
- 2 cups heavy Cream (well chilled)
- 3/4 cup granulated Sugar
- 1 whole Vanilla Bean (split and seeds scraped)
- 6 large Egg Yolks
- 1 tsp pure Vanilla Extract (for an extra splash of vanilla flavor)
Tools & Equipment
- Ice Cream Maker: A machine that churns the ice cream mixture to create a smooth and creamy texture. If you don’t have an ice cream maker, follow these steps.
- Mixing Bowls: Used for combining the ingredients before the cooking process begins.
- Whisk: Essential for mixing the egg yolks and sugar to a smooth consistency.
- Saucepan: Needed for heating the milk and cream mixture with the vanilla.
- Spatula: Helps in stirring the mixture gently while cooking to prevent sticking and burning.
- Fine Mesh Strainer: Used to strain the mixture, ensuring a smooth ice cream free of any cooked egg bits.
- Freezer-safe Container: For storing the churned ice cream until it reaches the desired consistency.
Instructions
Preparing the Base
- Combine Milk and Cream: In a saucepan, mix the milk, cream, and vanilla bean (including the pod). Warm over medium heat until it starts to steam, not boil.
- Mix Yolks and Sugar: In a separate bowl, whisk the egg yolks and sugar until they turn light and thick.
- Temper the Eggs: Gradually pour the warm milk mixture into the egg yolks, whisking constantly to prevent curdling.
- Cook the Custard: Return the mixture to the saucepan and cook over low heat, stirring constantly with a spatula, until it thickens enough to coat the back of a spoon.
- Strain: Remove from heat, extract the vanilla pod, and strain the mixture through a fine mesh strainer into a bowl to remove any cooked egg bits.
- Chill: Cover and chill the mixture thoroughly in the refrigerator, ideally overnight.
Churning the Ice Cream
- Prep the Ice Cream Maker: Following your ice cream maker’s instructions, set it up for churning. If you don’t have an ice cream maker, follow these steps.
- Churn: Pour the chilled mixture into the ice cream maker and churn according to the manufacturer’s instructions until it reaches a soft-serve consistency.
- Freeze: Transfer the churned ice cream to a freezer-safe container and freeze until firm, typically about 2-4 hours.

Serving Size, Prep, and Cook Time
- Serving Size: This recipe yields about 1 quart of ice cream, serving 8 people with a generous scoop each.
- Prep Time: The preparation takes about 20 minutes, with additional time for chilling the mixture.
- Cook Time: The custard will need about 10 minutes of cooking time, and churning takes approximately 20-30 minutes depending on your ice cream maker.
Additional Tips for Perfect Vanilla Bean Ice Cream
Here are some additional tips to crafting the perfect batch of vanilla bean ice cream:
Quality of Ingredients
- Vanilla Beans: Opt for high-quality, plump vanilla beans. The quality of the beans greatly influences the depth of flavor in your ice cream. Madagascar Bourbon vanilla beans are renowned for their sweet, creamy flavor with velvety after-tones.
- Dairy: Use full-fat milk and cream for the richest texture. The fat content is crucial for achieving that luxurious mouthfeel.
Custard Base
- Temperature Control: When cooking the custard base, gentle heat is key. A low and slow approach prevents the eggs from scrambling, ensuring a smooth texture.
- Consistency Check: The custard is ready when it thickly coats the back of a spoon, and a line drawn with your finger holds its shape. This is known as the “nappe” stage.
Chilling
- Overnight Chill: For the best results, chill the custard base overnight. A cold base churns into ice cream more efficiently, yielding a creamier texture.
- Ice Bath: To speed up the cooling process, place the bowl of custard in an ice bath, stirring occasionally until cooled, then refrigerate.
Churning
- Don’t Overchurn: Watch the ice cream closely as it churns. Overchurning can lead to buttery textures. Stop when it reaches a soft-serve consistency.
- Freezer Time: After churning, a few hours in the freezer will help the ice cream firm up. However, serving it immediately as soft serve is also a delicious option.
Serving
- Thawing: If the ice cream has been in the freezer for a while, let it sit at room temperature for a few minutes before scooping. This makes it easier to scoop and enhances the flavor.
- Pairings: Vanilla bean ice cream pairs beautifully with a variety of desserts. Try it with warm pies, fresh fruit, or a drizzle of caramel sauce for a delightful contrast.
Storage
- Airtight Container: Store the ice cream in an airtight container to prevent freezer burn and keep it fresh.
- Press Plastic Wrap: Press a piece of plastic wrap directly onto the surface of the ice cream before sealing the container to minimize ice crystal formation.
Complementary Dishes to Serve with Vanilla Bean Ice Cream
Whether you’re hosting a dinner party, enjoying a family meal, or indulging in a solo treat, these pairings will enhance the flavors of your vanilla bean ice cream treat:
Warm Desserts
- Classic Apple Pie: The warm, spiced filling and flaky crust of a classic apple pie complement the creamy vanilla ice cream, creating a perfect balance of warm and cold.
- Chocolate Lava Cake: The molten center of a chocolate lava cake paired with a scoop of vanilla bean ice cream offers a delicious vanilla and chocolate combination.
Fruit-Based Desserts
- Grilled Peaches: Slightly charred and caramelized grilled peaches topped with a scoop of vanilla bean ice cream make for a simple yet sophisticated dessert, ideal for summer evenings.
- Berry Crumble: A mix of juicy, tart berries under a crispy topping, served warm with vanilla bean ice cream melting crumble crust.
Baked Goods
- Brownies: The classic combination of warm, fudgy brownies and cold vanilla bean ice cream is a crowd-pleaser, perfect for casual gatherings or a cozy night in.
- Freshly Baked Cookies: Whether it’s chocolate chip, oatmeal raisin, or snickerdoodle, freshly baked cookies paired with a scoop of vanilla bean ice cream can be a comforting treat.
Drinks
- Affogato: This simple yet elegant Italian dessert featuring a shot of hot espresso poured over a scoop of vanilla bean ice cream is a delightful fusion of flavors and hot and cold.
- Root Beer Float: For a nostalgic treat, pair vanilla bean ice cream with root beer to create a classic float that’s bubbly, creamy, and irresistibly delicious.
Specialty Desserts
- Bananas Foster: This dessert with caramelized bananas, rum, and cinnamon, served with vanilla bean ice cream, offers an indulgent treat.
- Pecan Pie: The sticky, sweet filling and crunchy pecans of a pecan pie create a lovely flavor contrast when accompanied by smooth vanilla bean ice cream.
Homemade Vanilla Bean Ice Cream
- Total Time: 8 hours 50 minutes
- Yield: 8 1x
Ingredients
1 cup whole Milk (chilled)
2 cups heavy Cream (well chilled)
3/4 cup granulated Sugar
1 whole Vanilla Bean (split and seeds scraped)
6 large Egg Yolks
1 tsp pure Vanilla Extract (for an extra splash of vanilla flavor)
Instructions
Preparing the Base
- Combine Milk and Cream: In a saucepan, mix the milk, cream, and vanilla bean (including the pod). Warm over medium heat until it starts to steam, not boil.
- Mix Yolks and Sugar: In a separate bowl, whisk the egg yolks and sugar until they turn light and thick.
- Temper the Eggs: Gradually pour the warm milk mixture into the egg yolks, whisking constantly to prevent curdling.
- Cook the Custard: Return the mixture to the saucepan and cook over low heat, stirring constantly with a spatula, until it thickens enough to coat the back of a spoon.
- Strain: Remove from heat, extract the vanilla pod, and strain the mixture through a fine mesh strainer into a bowl to remove any cooked egg bits.
- Chill: Cover and chill the mixture thoroughly in the refrigerator, ideally overnight.
Churning the Ice Cream
- Prep the Ice Cream Maker: Following your ice cream maker’s instructions, set it up for churning. If you don’t have an ice cream maker, follow these steps.
- Churn: Pour the chilled mixture into the ice cream maker and churn according to the manufacturer’s instructions until it reaches a soft-serve consistency.
- Freeze: Transfer the churned ice cream to a freezer-safe container and freeze until firm, typically about 2-4 hours.
- Prep Time: 500 minutes
- Cook Time: 30 minutes
- Category: Dessert
- Method: Steam & Chill
Commonly Asked Questions about Vanilla Bean Ice Cream
Can I use vanilla extract instead of a vanilla bean?
Yes, you can substitute a vanilla bean with vanilla extract if necessary. The general rule is 1 teaspoon of vanilla extract for every 1 inch of vanilla bean. Keep in mind, though, that using an actual vanilla bean might give the ice cream a more nuanced flavor and the characteristic specks of vanilla seeds.
Why is my homemade ice cream too hard?
Homemade ice cream can turn out harder than commercial varieties due to the lower fat content and absence of commercial softening agents. To prevent this, ensure your mixture is thoroughly chilled before churning and consider adding a tablespoon of alcohol (like vodka or rum) as it lowers the freezing point, resulting in a softer texture.
Can this recipe be made without an ice cream maker?
Yes, it’s possible to make ice cream without a machine. After preparing the custard, place it in a deep baking dish or bowl in the freezer. Every 30-45 minutes, stir vigorously with a fork or hand mixer to break up any ice crystals, until the ice cream is frozen and creamy.
How long can I store homemade vanilla bean ice cream?
Homemade vanilla bean ice cream can be stored in an airtight container in the freezer for up to 2 weeks. For the best texture and flavor, consume within the first week. Remember to press a piece of plastic wrap onto the surface of the ice cream before closing the container to prevent ice crystals from forming.
Why do I need to temper the egg yolks?
Tempering egg yolks gradually raises their temperature to avoid curdling when they’re added to the hot milk and cream mixture. This ensures a smooth, velvety custard base for your ice cream without bits of cooked egg.
How can I enhance the vanilla flavor in my ice cream?
To intensify the vanilla flavor, consider adding a little extra vanilla extract or using a second vanilla bean. Infusing the milk and cream mixture with the vanilla bean for longer periods, or even overnight, can also deepen the flavor profile.
Can I reduce the sugar in this recipe?
While you can reduce the sugar, it’s important to note that sugar not only sweetens the ice cream but also affects its texture. Reducing sugar may result in a less smooth and more icy texture. If you need to cut back on sugar, consider using natural sweeteners like honey or maple syrup, but keep in mind that these will also affect the flavor and texture.
Is there a dairy-free alternative for this recipe?
Absolutely! For a dairy-free version, you can substitute the milk and cream with coconut milk, almond milk, or cashew cream. Keep in mind that the texture and flavor will differ from traditional vanilla bean ice cream.